
Not only does it become annoying, depending on what is causing the grinding, it could damage your laptop.
In order to fix it,and preferably yourself, you are going to have to dissemble it, but it will be way cheaper to do it this way.
Disclaimer: Opening up your laptop may void warranty depending on the model, especially older laptops. Don't attempt unless you know what you are doing and know for sure that opening the laptop won't void warranty or if the warranty has long been expired. I am not responsible if you damage your laptop in anyway while attempting this repair.
Also, be familiar of anti-static procedures to ensure you don't accidentally damage a vital part of the computer.
In this tutorial, I will be opening up my Sony Vaio CS (Model: VGN-CS250J). You may have to do something different and the components won't exactly be the same but the same process will be done more or less.
 |
| My Sony Vaio CS that will undergo surgery. |
Depending on the problem your tools will vary, but you need a Screwdriver and a bag to hold the screws.
If you are doing a fan replacement you need the following:

- Screw Driver
- Replacement Fan / Replacement Heatsink + Fan
- Toothpicks
- Alcohol (90-100%)
- Arctic Silver 5 Thermal Paste Grease (On the Right)

- Screw Driver
- All purpose machine oil (On the Right)
NO WD-40!! - Toothpicks
- Alcohol (90-100%)
- Arctic Silver 5 Thermal Paste Grease

Step 1: On most older computers, before you begin to disassemble the computer, we have to remove the battery unit, the Hard Drive, and just the cover that encases the RAM.
Once they are removed we can continue.
 | |
| RAM Cover, Hard Drive Cover, and Battery Unit Removed |
 | |||
| Sony Vaio's have this little thing right there for its LED Light. Unplug it. |
 | |
| This screw keeps the hard drive in place. |
 |
| And we should be somewhere around here. |

Step 2: Now for the actual disassembly. On this particular laptop, there are 21 screws including the 1 from the RAM case, the 2 from the hard drive case, and the screw that maintains the hard drive. All the screws that remain are the same except for 3. The two on the back corners next to the battery, and this little one here. This is a small one and doesn't fit anywhere else. DON'T LOSE IT.
 |
| Bottom Removed |
Step 3: After disassembly we should be looking at the motherboard of the computer. Don't get touchy feeley with it or your static electricity might fry it. Our focus is on the heatsink here.

Removal is very simple. Unscrew the 4 screws over the CPU as shown.
Also be sure to disconnect the wire coming out of the fan near the ram or else it will rip (and if you were intending on fixing the fan you just earned yourself a fan replacement for your heatsink or hope you are good with wires).
 |
| PROFIT? Not so fast! We're not done yet. |
Before we continue, check your fan. Physical damage? Melted somewhere? Fan chipped? Something that doesn't look right physically that causes a grind? Then you have to replace the entire heatsink. Look up the model number of the heatsink and order it from the internet. Already have one? Awesome! Skip to Step 5 now.
But what if it looks fine? Blow into the fan until the fan goes fast enough. Hear the grinding? Your fan needs some oil or maybe a little cleaning (doubt it but always check). Get your machine oil and lets jump into Step 4a). And I hope that oil isn't WD-40 because I said don't use it. It isn't effective.


 | ||
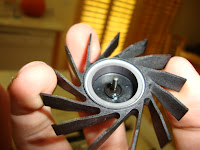
| Fan piece popped out |
Now its time to bring out the machine oil. Follow the directions of usage in the captions.
 |
| Pour 1 to 2 drops of machine oil in the hole |
 |
| smear a drop of oil on the magnetic insert |
 |
| Place fan in, hear it magnetically stick... Success!! |
Alright! We are almost there. It's now time to put everything back together. Skip over to Step 6)

Step 5: a) Use a tooth pick to remove either the sticky film or old thermal paste of the new heatsink. Thermal Paste might be on the heatsink because it came from another computer that may have been damaged or totaled and ironically that survived. Then with a cotton moth ball and alcohol clean the section.

Awesome! Your heatsink replacement is now ready! Lets jump over to step 6.

Step 7: Apply a generous, and I mean generous, amount of thermal paste onto the now cleaned CPU on the metallic part that was just cleaned off. Then use a toothpick to smear it around in the gently in the small area. Try not to make a mess and make sure it doesn't go anywhere else on the computer.


Success!! Your laptop should now be in working order.
 |
| Now we have Profit. |
No comments:
Post a Comment